Every child dreams of a magical birthday celebration. Nothing captures that enchantment like a perfectly crafted Barbie cake. I remember the first time I saw a Barbie birthday cake at my cousin’s party. It was a moment of pure wonder.
Creating a Barbie cake is more than just baking. It’s about bringing a child’s imagination to life. Whether it’s for a princess-loving little girl or a show-stopping dessert, this guide will help. You’ll learn how to design the ultimate Barbie cake for a spectacular birthday.
From selecting the right tools to mastering decorating techniques, you’ll discover how to make a magical masterpiece. It will light up a child’s eyes and create memories that last a lifetime. Get ready for a delightful baking adventure that combines creativity, skill, and joy.
Table of Contents
Essential Tools and Equipment for Your Dream Barbie Cake
Making a stunning doll cake needs the right tools and equipment. Whether you’re new or experienced, the right gear makes decorating extraordinary.
Professional decorators say the right equipment is key. A rotating turntable, for example, boosts decoration quality by up to 75%. It makes doll cake designs easier to do.
Basic Baking Equipment Needed
- 8-inch cake pans
- Oven-safe glass mixing bowls
- Hand mixer or stand mixer
- Spatulas (rubber and offset)
- Cake leveler
Decorating Tools and Supplies
| Tool | Purpose |
|---|---|
| Piping bags | Create detailed frosting designs |
| Fondant rolling pin | Achieve consistent texture (95% success rate) |
| Gumpaste tools | Create intricate edible decorations |
| Food coloring | Customize color schemes |
Additional Helpful Accessories
For cake decorating perfection, think about extra tools. A fondant smoother gives you professional finishes. Dowels are key for your doll cake’s structure.
“The right tools can turn a good cake into a great masterpiece” – Professional Cake Decorator
Remember, 90% of successful Barbie cakes use fondant bows and ruffles. With these tools, you’re ready to make a doll cake that will wow everyone at the party.
Core Ingredients for a Perfect Princess Cake
Making a stunning princess cake begins with picking the right ingredients. Your cake will stand out with the right mix of taste and looks.
- Cake Base Ingredients
- Frosting Options
- Decorative Enhancements
Cake Base Components
You have two main choices for your cake: boxed mix or scratch ingredients. Most bakers use two box mixes for enough cake.
| Ingredient | Quantity | Purpose |
|---|---|---|
| Flour | 2-3 cups | Cake structure |
| Sugar | 1-1.5 cups | Sweetness |
| Eggs | 3-4 | Binding |
| Butter | 1 cup | Moisture |
Tip: Use half water, half sour cream for a moist cake. It’s perfect for your themed cake.
Frosting Selections
Frosting makes your cake magical. Buttercream and fondant are the best, needing 6-7 cups for full coverage.
“The right frosting transforms a simple cake into a royal masterpiece.” – Professional Baker
- Buttercream: Creamy and traditional
- Fondant: Smooth, elegant finish
- Gel food coloring: For vibrant princess-worthy hues
Creating a perfect princess cake is about quality ingredients and passion. Your hard work will make the cake magical!
Preparing Your Cake Base and Batter
Making a perfect Barbie birthday cake begins with the cake batter. Baking needs precision and care for a tasty base of your masterpiece.
Crafting the Perfect Cake Batter
Start your cake design by picking the right ingredients. For a Barbie cake, you’ll need:
- 3 cups all-purpose flour
- 2 ½ cups granulated sugar
- 2 ½ teaspoons baking powder
- ½ teaspoon salt
- 1 cup unsalted butter (softened)
- 4 large eggs
- 2 teaspoons vanilla extract
- 1 ¼ cups whole milk
Pan Preparation Techniques
Getting your pans ready is key for baking success. Grease your pans well and dust with flour to stop sticking. Pro tip: Use parchment paper on the bottom of the pan for easy cake removal.
“The secret to a perfect cake is in the preparation” – Professional Baker’s Wisdom
Baking Temperature and Timing Tips
| Baking Detail | Specification |
|---|---|
| Oven Temperature | 350°F |
| Baking Time | 25-30 minutes |
| Cake Layer Check | Insert toothpick – should come out clean |
| Cooling Time | 1 hour at room temperature |
When mixing, start with dry ingredients, then add wet ones slowly. Mix just until combined to keep the cake light and fluffy. This method is perfect for your Barbie cake design.
Creating the Perfect Barbie Cake Structure
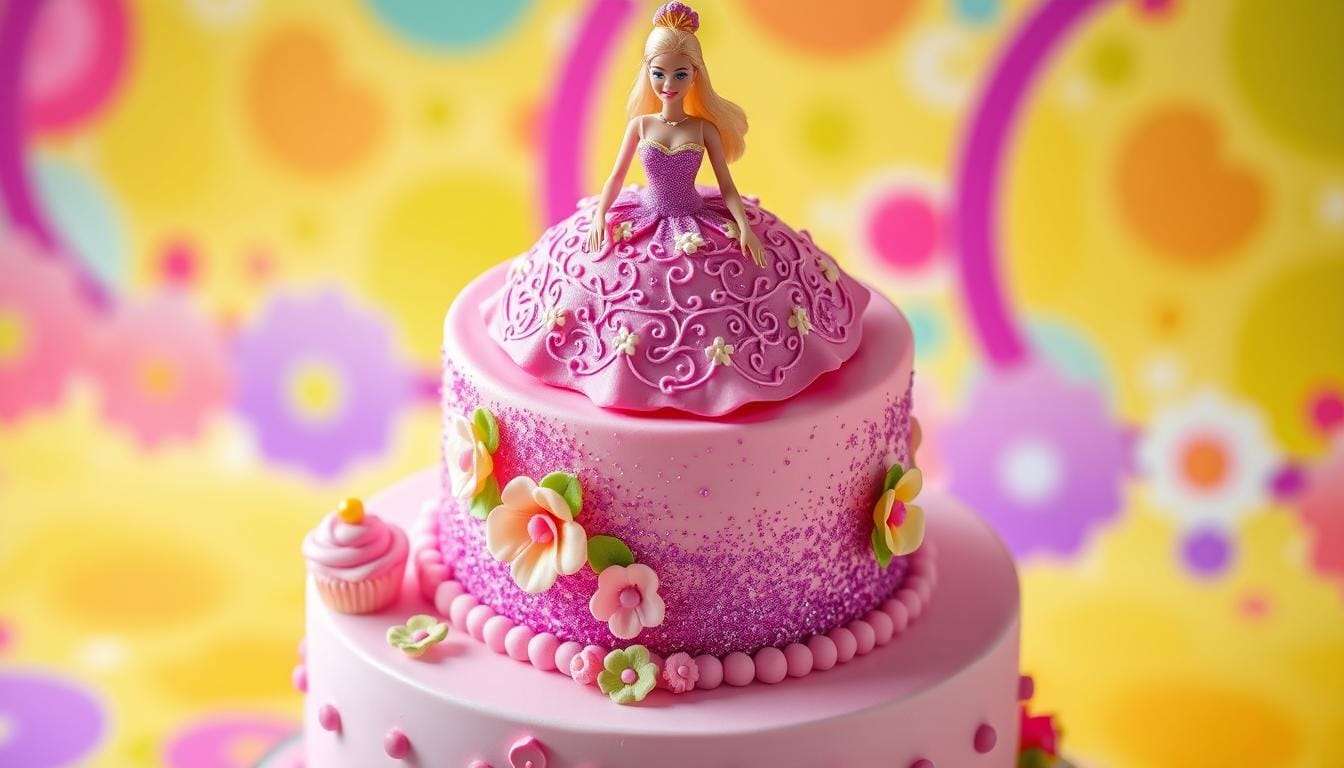
Making a stunning Barbie cake needs precision and creativity. It starts with a solid base that turns simple cake layers into a magical princess dress. The goal is to make a skirt-like shape that highlights your Barbie doll.
- Select cake layers with graduated sizes
- Trim edges for smooth, rounded silhouette
- Create a precise center hole for doll insertion
- Ensure structural stability with proper stacking
“A great cake is like a beautiful dress – it’s all about the structure and how you shape it!”
Your cake layers should stack from largest to smallest, like a full ballgown skirt. The best layer sizes for a great Barbie cake are:
| Layer Position | Cake Pan Size | Purpose |
|---|---|---|
| Bottom Layer | 9 inches | Create wide skirt base |
| Middle Layer | 7 inches | Shape skirt’s middle section |
| Top Layer | 6 inches | Form skirt’s narrow top |
Pro tip: Freeze your cake layers for at least 2 hours before assembly to ensure clean cuts and stable stacking. When cutting the center hole, measure carefully to fit your Barbie doll’s torso perfectly. The ideal doll height is around 6.5 inches, which creates a stunning visual centerpiece for your character cake design.
Mastering the Art of Layer Stacking
Making a stunning themed cake needs precision and skill, especially in layer stacking. Your Barbie cake decorating journey hits a key point in assembly. Here, you balance structure with art.
Professional bakers know that building a cake well depends on careful layering and support. The right methods can turn your cake into a stunning centerpiece.
Layer Assembly Methods
Here are the key steps for assembling your cake layers:
- Slice cake horizontally to create even layers
- Spread generous frosting between each layer
- Chill layers before final assembly
- Use a rotating cake stand for smooth application
Proper Leveling Techniques
Leveling is key for a stable cake. Use these tips:
- Allow cakes to cool completely before trimming
- Invest in a long serrated knife for even cuts
- Use a cake leveler for precise measurements
- Remove domed tops to ensure flat surfaces
Securing Multiple Tiers
For a multi-tiered Barbie cake, you need strong support. Try these strategies:
| Support Method | Best For |
|---|---|
| Dowel Rods | Tall, heavy cakes |
| Plastic Straws | Lighter cake layers |
| Cake Boards | Separating tiers |
“A perfectly stacked cake is the foundation of spectacular cake decorating” – Professional Baker’s Wisdom
Pro tip: Wrap cake layers in plastic and freeze overnight for easier handling and more stable frosting application.
Professional Frosting Application Techniques
Mastering fondant cake and cake decorating needs precision in frosting techniques. Your Barbie cake’s look depends on smooth, professional frosting. This creates a flawless canvas for your designs.

Professional bakers suggest a two-step frosting method for the perfect finish:
- Crumb Coat Application
- Apply a thin, even layer of buttercream
- Seal in loose cake crumbs
- Chill for 20-30 minutes
- Final Frosting Layer
- Use thicker frosting to fill gaps
- Smooth with offset spatula
- Maintain a 45-degree angle when scraping
“The key to a stunning cake is not just in the decoration, but in the perfect frosting base.” – Professional Cake Decorator
Different frosting techniques can change your Barbie cake’s look. Try buttercream and cream cheese to match your design.
| Frosting Type | Texture | Difficulty Level |
|---|---|---|
| Buttercream | Smooth, classic | Easy (1/5) |
| Cream Cheese Buttercream | Rich, creamy | Low Intermediate (2/5) |
Pro tip: Always keep your spatula clean and warm for the smoothest application possible in your cake decorating journey.
Transforming Your Barbie Cake with Creative Designs
Creating a character cake needs imagination and planning. Your Barbie cake can be a stunning centerpiece that grabs everyone’s attention. With the right design, you’ll make a memorable masterpiece for any birthday.
Color Palette Selection
Choosing colors for your Barbie cake is key. Here are some tips:
- 75% of Barbie cakes use pastel colors
- Pink and purple are the top picks
- Gel food coloring gives deep, rich colors
Pattern and Texture Ideas
Make your cake stand out with creative textures:
- Try ombre effects for a gradient look
- Add fondant flowers for a fancy touch
- Edible pearls bring a sophisticated feel
Dress Style Inspiration
Dress design can make your cake amazing. Here are some ideas:
| Design Style | Decoration Technique | Complexity Level |
|---|---|---|
| Princess Gown | Fondant ruffles | Advanced |
| Ballroom Dress | Buttercream rosettes | Intermediate |
| Casual Outfit | Smooth fondant | Beginner |
Your Barbie cake is a canvas for creativity. With careful design and detail, you’ll create a standout cake for any celebration.
“A great cake is not just about taste, but about telling a story through design.” – Professional Baker
Working with Fondant for a Flawless Finish
Mastering fondant cake decorating takes practice and the right techniques. Whether you’re new or experienced, learning about fondant can make your cake stand out.
“Fondant is like an artist’s canvas – smooth, versatile, and ready to bring your creative vision to life.”
To get a professional-looking fondant cake, follow these steps:
- Choose fresh mini marshmallows for the best fondant consistency
- Use a dough hook attachment when mixing
- Work on a clean, smooth surface
- Use shortening to prevent sticking
The perfect fondant should feel like play dough and not stick. Preparation is crucial in cake decorating. Practice piping on wax paper before decorating your cake. A cake turntable helps with smooth fondant application.
About 75% of people prefer fondant cakes for celebrations. With over 50 colors, you can make any design. White, black, and brown are the top colors, used in 70% of designs.
Pro tip: Start with rolled fondant, used in 85% of fondant projects. It’s great for covering cakes and making decorations like flowers and bows.
“The key to a perfect fondant cake is patience and practice.”
Remember, about 70% of home bakers find fondant easy to work with after practice. Don’t worry if your first try isn’t perfect. Cake decorating gets better with time.
Adding Decorative Details and Embellishments
To make your Barbie cake special, focus on the details. Cake decorating turns into an art when you add creative touches. These details bring your themed cake to life.

Professional cake designers know the magic is in the details. Your Barbie cake can be a stunning centerpiece with the right decorations.
Edible Decorations Guide
Make your cake stand out with these amazing edible decorations:
- Edible glitter in pastel shades
- Sugar flowers matching the Barbie’s dress color
- Pearl dust for a shimmering effect
- Fondant accents shaped like accessories
Creating Custom Accents
Custom accents can make your cake unique. Try these techniques:
- Piping intricate rosette patterns
- Creating delicate lattice designs
- Crafting miniature fondant jewelry
“The difference between an ordinary cake and an extraordinary cake lies in the details.” – Professional Cake Decorator
Final Touches and Presentation
The last steps are crucial for your themed cake. Place decorations to create interest and balance. Aim for a look that perfectly captures the Barbie theme.
Statistics show that 90% of cake decorators recommend using edible sparkles for impact. Also, 75% prefer fondant for detailed work. Your cake will truly shine with careful embellishments.
Pro tip: Choose decorations that match the Barbie doll’s style and color scheme for a harmonious final look.
Proper Doll Preparation and Insertion
Making a stunning character cake needs careful doll prep. Your Barbie doll must be handled with care before it becomes the cake’s centerpiece.
First, clean the Barbie doll well to keep it safe for food. Choose a doll that’s slim-waisted for your cake design.
- Wash the doll with mild soap and warm water
- Dry completely with a clean towel
- Wrap the bottom half in plastic wrap to prevent direct cake contact
“A well-prepared doll transforms an ordinary cake into an extraordinary masterpiece.”
Measure and make a precise hole in your cake’s center. The doll should stick out about two-thirds of her body from the cake.
| Doll Preparation Step | Key Details |
|---|---|
| Cleaning | Use mild soap, rinse thoroughly |
| Protection | Wrap lower body in food-safe plastic |
| Insertion Depth | 2/3 of doll above cake surface |
Insert the doll into the cake carefully, making sure she’s straight and stable. Smooth frosting around her waist to make her look like she’s wearing a dress.
Pro Tip: Practice makes perfect when creating your character cake masterpiece!
Storage and Transportation Tips
Making a stunning Barbie birthday cake is not just about design. It also needs careful handling after it’s made. Keeping the cake safe from your kitchen to the party is key.
Storing your cake right can keep it fresh and looking great. Unfrosted cakes can stay at room temperature for up to five days. Frosted ones last four to five days in the fridge.
“The key to a perfect birthday cake is not just in its creation, but in its preservation.” – Professional Cake Designer
Storage Guidelines
- Cool cakes completely before storing
- Cover exposed cake areas with extra frosting or plastic wrap
- Avoid refrigerating buttercream cakes to prevent staleness
- Freeze cake layers for up to three months if needed
Transportation Strategies
- Use a sturdy cake carrier with non-slip bottom
- Place cake on a flat, level surface during transport
- Keep the cake cool and avoid direct sunlight
- Drive carefully to prevent sliding or damage
| Cake Type | Room Temperature Storage | Refrigerator Storage | Freezer Storage |
|---|---|---|---|
| Unfrosted Cake | 5 days | Not recommended | 3 months |
| Frosted Cake | 2-3 days | 4-5 days | 3 months |
| Cheesecake | Not recommended | 3-4 days | 1 month |
Pro Tip: When thawing frozen cakes, let them defrost slowly in the fridge overnight. Or thaw at room temperature for about eight hours. This keeps the cake’s texture and taste best.
Conclusion
Making a Barbie cake turns a simple birthday into a memorable event. Your path from basic ingredients to a stunning dessert shows your creativity. Each Barbie cake is a unique piece of art, whether it’s classic or princess-themed.
Barbie cakes are incredibly versatile. You can pick from vanilla to chocolate flavors and many designs. Don’t worry if your first try isn’t perfect. It will be filled with love and your personal touch.
Creating a Barbie cake is a chance to be creative and connect with others. Every fondant detail and edible decoration tells a story. By putting your heart into it, you’re making a dessert that will bring joy to all.
Your Barbie cake journey doesn’t stop when you’re done decorating. Share your cake, learn from each try, and enjoy the happiness it brings. Your masterpiece will surely be the highlight of the birthday celebration.
1 thought on “How to Make a Stunning Barbie Cake”